

How to Write a Product Demo Video Script That Actually Converts
Updated: 3 days ago

A product demo video script is a time-budgeted, scene-by-scene blueprint that tells your team exactly what to say, show, and click, second by second. It exists so nobody freezes in front of a screen recorder wondering what happens next. The default runtime you want is 90 seconds, landing somewhere between 150 and 175 words, tight enough to hold attention and long enough to prove the product actually works.
Here’s the fastest version you can use right now:
Hook (0:00–0:08): Name the problem in one line.
Demo (0:08–1:15): Show the product solving it, one workflow only.
Payoff (1:15–1:22): Land on the result. No detours back to a home screen.
CTA (1:22–1:30): Tell the viewer exactly what to click next.
Full templates, AV formatting, and recording rules follow below.
Key Takeaways
A tight product demo video script protects one viewer, one problem, and one outcome inside a 90-second, 150 to 175-word runtime, backed by production-grade AV formatting and recording discipline.
Point | Details |
Default to 90 seconds | Aim for 150 to 175 words using the Hook, Demo, Payoff, CTA skeleton. |
Protect the demo section | Trim Setup or Result first; the Demo beat is the only one worth stretching. |
Use two-column AV format | Split audio and visual columns whenever more than one person touches production. |
Fix your window size | Record at 1280×800 or 1440×900 and reuse that size across your whole clip library. |
End on the payoff | Stop recording on the final result screen instead of returning to a home view. |
What Makes a Product Demo Video Script Actually Work?
Every reliable demo script script is built on the same skeleton, whether it runs 60 seconds or three minutes. The seven-part version breaks down like this:
Hook — the line that stops the scroll.
Stakes/Problem — why this matters to the viewer specifically.
Promise — the one outcome you’re about to prove.
Setup — the minimal context needed before the demo starts.
Demo/Workflow — the product doing the actual work.
Result/Payoff — the moment the value lands.
CTA — the next click.
A widely used template assigns rough time budgets to each beat: Hook 5 to 10 seconds, Stakes 10 to 15, Promise 5 to 10, Setup 10 to 15, Demo 45 to 75 seconds, Result 10 to 15, CTA 5 to 10. Add it up and you land close to 90 seconds, which keeps showing up across demo video guides as the sweet spot for landing-page demos.
If your product or use case is simple, drop to the five-part compressed version: Hook, Problem, Solution, Features-in-action, CTA. This works well for a single-feature announcement or a follow-up clip after a sales call, where the viewer already knows the context and doesn’t need the full setup.
Whichever structure you pick, protect it with one rule: one viewer, one problem, one outcome. The moment a script tries to cover three use cases or four personas, it turns into a feature list nobody watches to the end. Cut ruthlessly rather than let the demo section balloon to cover every button on the interface.
Ready-to-Use Product Demo Video Script Examples
These three templates cover the situations you’ll hit most often: a cold-audience awareness clip, a longer use-case walkthrough, and a short follow-up after a sales call. Word counts follow the 150 to 260 word ranges that map to each runtime.
1. The 90-second awareness demo (150 to 175 words)
[0:00–0:08] HOOK: “Your team spends four hours a week on manual reporting. Here’s how to get it back.” [0:08–0:20] STAKES: Show the old, painful process on screen. [0:20–0:30] PROMISE: “Watch how this cuts that to ten minutes.” [0:30–1:10] DEMO: Screen recording of the actual workflow, click by click. [1:10–1:22] PAYOFF: Final report generated on screen. Hold the frame. [1:22–1:30] CTA: “Try it free at [link].”
2. The 2-minute use-case walkthrough (220 to 260 words)
Same skeleton, but the Setup and Demo sections stretch to cover a second workflow or an integration step. Add a SUPER at the halfway mark naming the feature being shown, so viewers who join late still get oriented.
3. The 60 to 75-second sales follow-up (120 to 140 words)
[0:00–0:06] HOOK: “Following up on the question you asked about reporting.” [0:06–0:55] DEMO: Direct answer to that exact question, nothing else. [0:55–1:05] PAYOFF: The specific result they asked about. [1:05–1:15] CTA: “Reply and I’ll set this up on your account.”
To trim any of these, cut Setup first. To expand, lengthen the Demo section only. It’s the one beat that consistently earns extra runtime.
Two-Column AV Format vs. Single-Column: Which Should You Use?
Choose two-column AV format the moment more than one person touches production: a voiceover artist, a screen recorder, and an editor working from the same document without reading it cover to cover. This is the industry standard for multi-stakeholder productions, because each person can scan straight to the column they need. Single-column works fine for a solo creator narrating their own screen recording in one sitting.
A two-column script needs, at minimum:
Audio column: VO line, SFX cues, music direction, timing marker.
Visual column: shot description, on-screen action, SUPER or lower-third text, exact duration.
Mark mandatory shots (logo bumpers, legal disclaimers, brand color requirements) in bold or all caps so nobody cuts them accidentally during editing.
A sample row:
Timing | Audio | Visual |
0:22–0:30 | VO: “Add a task in two clicks.” | Screen: cursor clicks “New Task,” MANDATORY logo watermark bottom right |
Pro Tip: Write the audio column so it reads well completely on its own. If your VO script sounds clean without the visuals attached, the visuals will be easier to design and the voiceover recording will go faster.
Pre-Production Checklist for Recording Clean Demo Footage
A messy recording session is the single biggest reason teams reshoot a demo three times. Fix it with a short checklist before anyone hits record.
Build a clean demo account populated with realistic, non-embarrassing sample data.
Record just the application window, not the full desktop, and shoot a short test clip before the full take.
Fix your window size at 1280×800 or 1440×900 and keep it consistent across every clip in your library.
Turn on Do Not Disturb, close unrelated apps and tabs, and rehearse the click path twice before recording.
Move your cursor at roughly 60 to 70% of normal speed, pause about one second before each key click, and let outputs sit on screen for 2 to 3 seconds before moving on.
End the recording on the final payoff screen. Never navigate back to a home page after the money shot.
Consistent window sizing does double duty: it also makes future changelog clips and social cutdowns visually match your existing library. For landing-page embeds, export as muted, autoplay, playsinline, and looped so the clip behaves on mobile without a play button interrupting the page.
How Do You Adapt a Demo Script for Different Platforms?
The seven-beat structure holds up everywhere. What changes is pacing, sound, and which beats you cut first.
Sound-off social clips: go visual-first, lean on SUPERS instead of VO, and cut Setup entirely.
Landing pages: keep a measured voiceover under 150 words per minute for anything information-heavy.
Onboarding videos: stretch the Demo section and add a second use case since viewers already opted in.
Sales follow-ups: cut straight to the answer the prospect asked about, skip the Hook entirely.
Runtime | Word count | Pacing note |
90 seconds | 150 to 175 words | Standard demo pace, one workflow only |
2 minutes | 220 to 260 words | Room for a second use case or integration step |
60 to 75 seconds | 120 to 140 words | Fast, answer-first, minimal setup |
What Producers Need in the Brief Before They Start Filming
After two decades producing corporate and branded video, we can tell you the scripts that shoot clean share the same traits. A tight brief eliminates most of the reshoots we see.
Producers need the runtime target, the intended viewer, any mandatory shots or legal lines, and a clear file-naming convention before a camera or screen recorder turns on. The most common client mistakes we run into: a demo account still full of test data and placeholder text, brand assets that don’t match across slides, and mandatories that surface for the first time during review instead of in the brief. Each one adds a full round of revisions that a five-minute checklist would have prevented.
At Puritano, we run review cycles off a single read-only script so notes land in one place, and we hand off labeled, versioned footage rather than a folder of loose takes. If your team needs a second look at how to brief a video production team before your next shoot, that’s a good place to start whether or not you end up hiring us.
What the Data Actually Tells Us About Demo Scripts
Most advice on demo scripts treats structure and word count as the whole job. It isn’t. The scripts that convert are the ones written knowing exactly how the footage will be recorded, which is why pacing rules like pausing before a click or holding the window size steady matter as much as the words on the page.
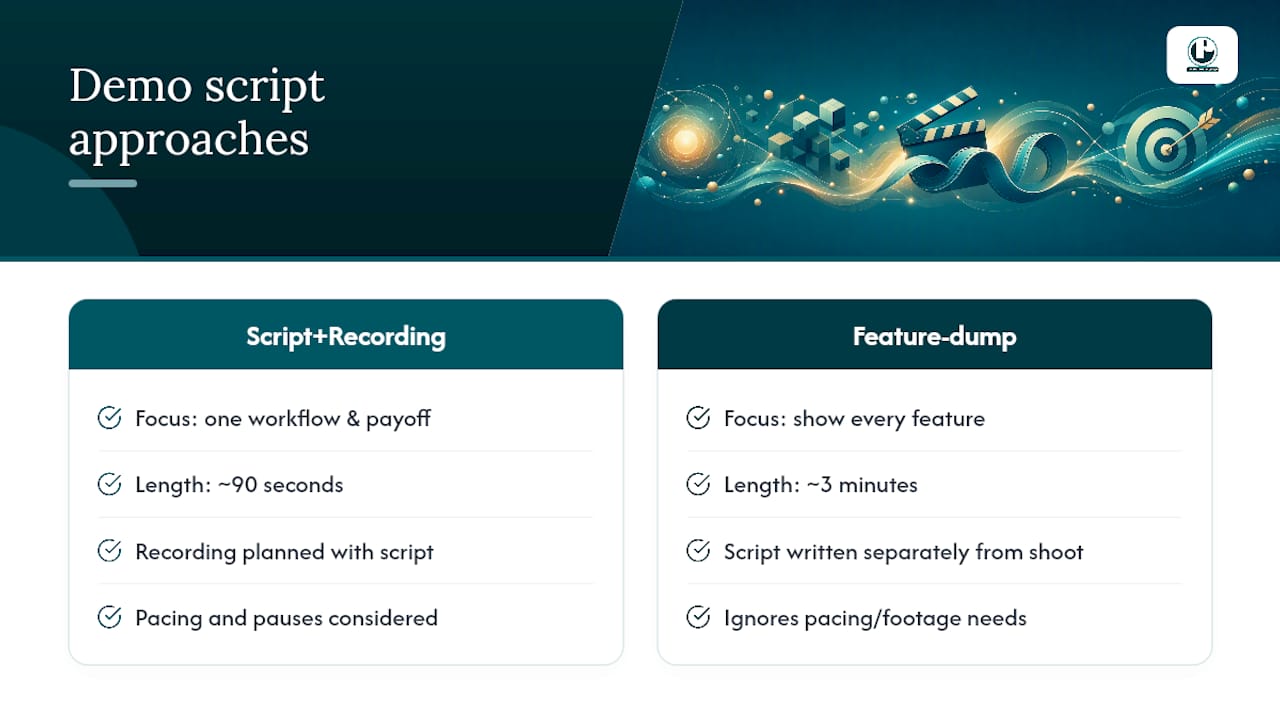
The overrated piece of conventional wisdom here is feature coverage. Teams keep writing scripts that try to demonstrate everything the product does, and every guide worth reading says the opposite: pick one workflow, one payoff, and cut the rest. A 90-second script that nails one use case will outperform a three-minute script that name-checks ten features nobody remembers by the end.
If you take one thing from this: write the script and the recording plan together, not sequentially. A script written in isolation from how it’ll be shot is where reshoots come from, not the writing itself. If your team plans to add aerial B-roll or location footage around the demo, briefing that shoot properly matters just as much as the screen recording does.
— Charlie
Sources
Recommended
Tight demo scripts are written around a hard truth. The product itself is often hard to picture. We introduced LUGA, an artificial intelligence personality platform from Interactive Data Systems, in a 60-second story film built to make abstract technology felt, and we returned to produce the product films for the company's Enterprise and Entertainment releases. Software with no obvious visuals needs the same discipline described here. One problem, one workflow, one result the viewer can picture themselves using. When the story is clear at that length, the demo has something solid to follow.


Comments